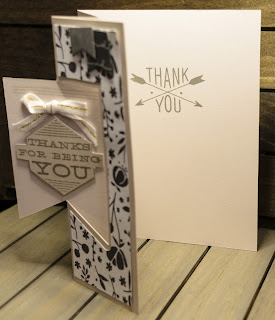
There’s two ways to make the card, so I’ll do both ways, but since I was making so many cards, it is easier via the cricut method. You can fit two card bases on a sheet of cardstock, and I think it really shows off the new CTMH two-tone cardstock.
Thin-cut (single card) way:
1.) Cut a sheet of cardstock 5 ½” tall by 10 ¾” wide
2.) Position thin cut using washi tape ¾” away from edge of paper. Ideally the score lines for the front should be at 2 ¼” and 3 ¼” so mark those in light pencil lines at the top of your card. Run thru cuttlebug (or other die cutting machine) just so that it goes up to the line and only cuts the edge. Flip the card around and do the same on the other side.
3.) Score cardstock at 2 ¼”, 3 ¼” & 6 ½” . For the 2 ¼” and 3 ¼” score lines DO NOT go thru the cutout.
4.) Use bone folder to fold the card over at the 6 ½”
5.) Fold card back at 3 ¼” score line (the cardstock should meet up with the first fold edge of the card)
6.) Fold at the other score line (the two un-folded edges of the cardstock should meet. If not, use paper trimmer to trim off extra)
7.) Out of patterned paper, cut two pieces that are 5 ¼” tall by 1 ¾” tall. Pick one for each side of the card, place it on the card and put the thin cut where it should be on the card, then nudge it over a smidge and using washi tape, tape it to the patterned paper on one side, and run that through the Cuttlebug. Repeat for the other side. Now there should be an outline border for the patterned pieces.
The Cricut way:
 1.) Here is an svg that has two card bases on a single 12x12 page. Import file into cricut design space & cut however many you need. I cut it so that the dark side of the cardstock was facing up on the mat. This way the lighter color is on the inside of the card.
2.) Score at 2 ¼”, 3 ¼” & 6 ½”
3.) Use bone folder to fold the card over at the 6 ½”
4.) Fold card back at 3 ¼” score line (the cardstock should meet up with the first fold edge of the card)
5.) Fold at the other score line (the two un-folded edges of the cardstock should meet)
6.) Also attached is the patterned paper svg. Import file into design space. There are six different sets (12 total) of patterned paper per page. I also included an optional inside banner in case you wanted to use that instead, I liked how it looked switching up the different patterns on the inside banner, but you could also use the same pattern on both sides.
Finishing Touches:
8. Using the smallest banner thin cut, use it to cut out complementary banner colors.
9. Stamp sentiment inside of card and lines on top of swinging banner. Stamp outer sentiment on dark side of paper & fussy cut. Use 3d foam dot to attach to card. Tie flat ribbon bow and use thin foam dot to attach to card.
Here's what you need to make the card yourself:


No comments:
Post a Comment