Sunday, May 17, 2020

Yoda Best - Letter Substitution card


I really enjoyed the series The Madalorian on disney, we actually got disney plus just to watch it! And I've watched it twice now, and enjoyed it each time. 

This card really make me think of the show, and it's a fun all occasions kind of card. Like the inside could be anything from "happy birthday" to "thank you" to "This is the way" or "I have spoken" (ha, ha - those are quotes from the show).  But I love all occasions cards, they tend to be the cards I grab most to use in actual life. 

I'm taking Spring Card Camp thru online card classes dot com and I thought this would be perfect for the "letter substitution day." So I know I needed to share. 

So, I made the card front 5" x 7" so it's a greeting card size & takes the a7 envelope size.  I used Close to My Heart's Aurora paper that has a bunch of different constellations on it for the background.  I sanded the edges of the paper after I adhered it to the card base so that it would have a little bit of a more weathered look to it. 

I used a star wars font and cut out the sentiment with my cricut and cut it out from CTMH's Silver Foil paper, and ran it through my cuttlebug with the Tim Holtz 3-D Texture Fade (the Foundry one, I know he says to run it thru at least three times, but I just do once, so that the pattern is a little more subtle.)

Using 3-D foam tape, I popped up the sentiment so that it feels away from the background paper.  I used Diamond stickles to accent the background paper, and while that was drying, I stamped and cut out "The Child."

For the O I used Kindred Stamps' Chickie Nuggies stamp and colored it in using several different Spectrum Noir Tri-color markers: 

I really like using the Tri-color markers, you'll see a section of my website all about coloring with them.  They make it easy to add shadowing and dimension to anything you stamp! 


Tuesday, July 30, 2019

Share the Joy Card - You Color My World


I really like making cards, but sometimes I'm totally out of time.  I don't know how it happens, but I realize I need a card and no time to make an intricate fussy card (which I typically love making).  Which is why I totally fell in love with the new Close to My Heart card front thin cuts.  It cuts out 12 holes and it's sized to fit the front of a regular A2 notecard with a thin border all the way around the card.

So this card is a fun AND QUICK one - I had been lusting after some of the fancy ink blending brushes, and found these on Amazon - they are very similar and they have cleaned off easily so far.  I started with the light color, Peach, and the ink really blended nicely into the card.   After Peach, I put on Pixie, Raspberry and then Pansy

The best way to blend the colors is really going from light to dark, no matter which colors you choose.

Right now is a great time to pick up the Pansy ink from Close to my Heart, it's retiring at the end of August.  The Pansy purple color is fantastic, and around the greater New Orleans area, it's very similar to LSU purple. So I'm going to be sad to see it retire!  

After blending the colors in an arc, the card is very nearly done!  I cut the white card front using the Share the Joy thin cuts die from Close to my Heart. 

I found a scrap of Pansy paper, embossed it with the retired swiss dots embossing folder (but really the embossing is just a little extra detail).  The Wild and Punny stamp set has a bunch of animal characters and I just liked the sentiment to go along with how pretty the coloring was on the card.  

So when I find a really fun stamp set that I like that has fun characters to color in, like the Wild & Punny ones, what I like to do is cut out and stamp a bunch of them, and then I pack them into a little pencil pouch and pop them into my bag or purse with the marker pouch I have.  Then when I'm waiting for someone or I have a free minute during lunch, I can take them out and work on a little coloring.  

Then, because I have the critters all ready to go, sometimes I like to see how they would look on a card front, but on this card I thought they were a little too busy - so I went back to the original with just the flamingo on them.  

I think it took me longer to try and decide which Wild & Punny critters to use than it took me to make the rest of the card! 


Here's what you need to make the card yourself:

Oval Makeup Brushes (from Amazon) 

Wild and Punny Stamp Set (only available until August 31, 2019) 

Swiss Dots Embossing Folder (retired - link goes to other embossing folders) 

Peach Ink
Pixie Ink
Raspberry Ink
Pansy Ink*

White Daisy Cardstock  
Pansy Cardstock 

Value Pack of Envelopes/A2 Cards

Share the Joy Thin Cuts Bundle


*I hope that these instructions inspire you create a piece of your own artwork because I like making and giving out cards. These links go to my Close to my Heart storefront, so you can replicate the card as closely as you desire, and while it does help me out (and that's nice and I appreciate it) I am always interested in seeing what art you create. 

Monday, July 24, 2017

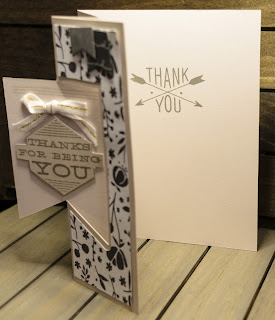
Thanks for being you - Swinging Two-Tone Card

Linda's CTMH 2017 AI Card Swap - This is for the Swinging Two-Tone Card

There’s two ways to make the card, so I’ll do both ways, but since I was making so many cards, it is easier via the cricut method. You can fit two card bases on a sheet of cardstock, and I think it really shows off the new CTMH two-tone cardstock.

Thin-cut (single card) way: 

1.) Cut a sheet of cardstock 5 ½” tall by 10 ¾” wide
2.) Position thin cut using washi tape ¾” away from edge of paper.   Ideally the score lines for the front should be at 2 ¼” and 3 ¼” so mark those in light pencil lines at the top of your card. Run thru cuttlebug (or other die cutting machine) just so that it goes up to the line and only cuts the edge.  Flip the card around and do the same on the other side.
3.) Score cardstock at 2 ¼”, 3 ¼” & 6 ½” .  For the 2 ¼” and 3 ¼” score lines DO NOT go thru the cutout.
4.) Use bone folder to fold the card over at the 6 ½”
5.) Fold card back at 3 ¼” score line (the cardstock should meet up with the first fold edge of the card)
6.) Fold at the other score line (the two un-folded edges of the cardstock should meet. If not, use paper trimmer to trim off extra)
7.) Out of patterned paper, cut two pieces that are 5 ¼” tall by 1 ¾” tall.  Pick one for each side of the card, place it on the card and put the thin cut where it should be on the card, then nudge it over a smidge and using washi tape, tape it to the patterned paper on one side, and run that through the Cuttlebug.  Repeat for the other side.  Now there should be an outline border for the patterned pieces.

The Cricut way: 
1.) Here is an svg that has two card bases on a single 12x12 page.  Import file into cricut design space & cut however many you need.  I cut it so that the dark side of the cardstock was facing up on the mat.  This way the lighter color is on the inside of the card.
2.) Score at  2 ¼”, 3 ¼” & 6 ½”
3.) Use bone folder to fold the card over at the 6 ½”
4.) Fold card back at 3 ¼” score line (the cardstock should meet up with the first fold edge of the card)
5.) Fold at the other score line (the two un-folded edges of the cardstock should meet)
6.) Also attached is the patterned paper svg.  Import file into design space.  There are six different sets (12 total) of patterned paper per page.  I also included an optional inside banner in case you wanted to use that instead, I liked how it looked switching up the different patterns on the inside banner, but you could also use the same pattern on both sides.

Finishing Touches:
8.  Using the smallest banner thin cut, use it to cut out complementary banner colors.

9. Stamp sentiment inside of card and lines on top of swinging banner.  Stamp outer sentiment on dark side of paper & fussy cut.  Use 3d foam dot to attach to card.  Tie flat ribbon bow and use thin foam dot to attach to card.

Here's what you need to make the card yourself:  

Wednesday, May 17, 2017

Color Dare #243 - Bright Beautiful colors!

 The CTMH stamp of the month is fabulous - I've been using it on everything.  I really like the sentiment - it's pretty large sized, so I think it's really good for the larger scrapbook sized art, but it's fun to use on a card, too, because it really makes the art stand out. 

So this card I made for the new color dare, but I think it'll work great for the hubby.  I used Lagoon to stamp out the main LOVE stamp - here's the stamp of the month, you can get it for only $5 when you spend $50 during the month of May

I really like how well Lagoon and Blossom go together, so I very carefully colored in the inside negative space of the stamp with one of the CTMH alcohol markers, one that was the closest to Blossom.
I stamped the "Hello" from a retired stamp set, but it could have easily been from one of the alphabet stamps.  I had the paper frame left over from another project that I used the cricut to cut out the shape, so I trimmed the paper down to the standard card size. 

Next, I used the new Nesting Heart thin cuts to cut a heart out of a front heart (and kept the little heart to use on another project) and ran it thru again to get a back side to the heart without any cutouts. 

So last week, I made my own colored glitter - I used plain white glitter from the store and dropped in about 10 drops of the raspberry colored alcohol reinker and mixed everything up, using a plastic fork and mixing it up.  The colors came out great, and I like it when the glitter matches the ink colors, it's a little subtle touch, but I think it looks great. 

So I used some double-sided tape and covered the heart back, popped on the heart "front" and then pushed the colored glitter into the tape.  I used 3d foam tape to pop it up and out a little bit.

I stamped the heart outlines from a retired set and used watercolor pencils to color in the heart outlines.  Then, because I'm totally into the sparkley lately, instead of using water to smooth out the color in the hearts, I used the clear shimmer brush, so that brought in some sparkly accents to go with the glitter heart. 

This was all part of the Color my Heart Color Dare #243, and I think the card came out super cute - it's always fun to do a totally girly kind of card, and the colors were really inspiring!  Thanks!   

Tuesday, May 9, 2017

Sparkle and Shine inspired card

Custom glitter!  Shiny! Sparkly!  To find out how to do all this, make sure to sign up for the Sparkle & Shine online class - check out this link here to see more about the class.  

The thing that totally blew my mind, however, was a basic thing - of course you would have your own specific color of glitter on hand.  I'm new to card making and I'd never thought about it and it seemed like fun!  I got some bulk super fine white glitter at the local box store, took it home, and in plastic cups (and using a plastic fork - no one wants to eat glitter for the next month) mixed a bunch of glitter with about 10 drops from the CTMH reinker bottles.  What I had on-hand came out marvelously.

Then I cut down a piece of crystal blue cardstock to a little smaller than a regular card size (4" x  5.25") and used the Happy thin cut to cut out the shape for the words.  Then I used a piece of double-sided adhesive and cut that down to the size of the Happy "hole" and applied it to the wrong side of the card.

The next part was super fun - I took the differently colored glitter and rubbed it into the exposed adhesive so it looked like a rainbow had left a mess on the card.  I brushed away the glitter, and watercolored a few thin cut hearts.  Then it was time for some embossing fun - I embossed the "Birthday" strip for the front and the same sentiment on the inside of the card.  I used the thistle ink and clear embossed it on the inside to match the sentiment on the outside of the card.  Embossing is still so much fun, it always seems like magic is going on when it starts appearing.  I used 3-D foam tape to add the "birthday" ribbon and the hearts onto the front of the card.  For the heart on the ribbon, I used two layers of foam tape so it would pop out more.

The final version came out looking so subtle & fun, but it's minimal enough that it "felt" like it matches the recipient's taste.


Monday, May 1, 2017

Color My Heart Color Dare #241 - White, Lemon, Raspberry & Willow

So this is my first time trying the color my heart color dare, but I *love* the color combinations & I was playing with a new stamp set from Seasonal Expression 2 and it worked out perfectly.  

http://colormyheartcolordare.blogspot.com/2017/04/color-dare-231-white-daisy-lemon.html


>  This week we are challenging you to use all and only these colors: White Daisy, Lemon, Raspberry and Willow.

It's fun to play with a limit, because it really helps edit down your choices - so I worked with only one stamp set, Fiesta Time.  Fiesta time is perfect for Cinco de Mayo - so I made a fun card celebrating my love of Mexican food.  


I stamped Raspberry and Willow on the Lemon cardstock and then I clear embossed those to give them a little depth. On the inside of the card, I stamped the sentiment in raspberry and then added a bunch of the little ribbons in Lemon, Raspberry & Willow. I used an oval thin cut and cut thru the card and the lemon cardstock in the perfect spot, and then used a white pen to draw a little border around it. Then I used a couple of smaller ovals from Raspberry and Willow, and then white embossed the margaritas, fussy cut and switched the colors up. Then I popped them up and tilted them. It's hard to tell, but I clear embossed some of the ribbons on the front of the Lemon cardstock also, which gives it a nice finish. 

Thanks for looking - this was fun to do, hope you enjoy the submission. 

Stamp set used:
C1681 - Fiesta Time


Other supplies: Lemon, raspberry & willow cardstock;
Lemon, raspberry, willow & versamark inks
Clear & white embossing powder
Nesting Oval thin cuts
Scissors, foam tape, card base and glue